The Art of Creating Normal Maps: Enhancing Realism in 3D Modeling
Related Articles: The Art of Creating Normal Maps: Enhancing Realism in 3D Modeling
Introduction
With enthusiasm, let’s navigate through the intriguing topic related to The Art of Creating Normal Maps: Enhancing Realism in 3D Modeling. Let’s weave interesting information and offer fresh perspectives to the readers.
Table of Content
- 1 Related Articles: The Art of Creating Normal Maps: Enhancing Realism in 3D Modeling
- 2 Introduction
- 3 The Art of Creating Normal Maps: Enhancing Realism in 3D Modeling
- 3.1 Understanding Normal Maps: A Visual Guide
- 3.2 Creating Normal Maps: A Step-by-Step Process
- 3.3 Tools and Techniques for Normal Map Creation
- 3.4 Benefits of Using Normal Maps
- 3.5 FAQs about Normal Maps
- 3.6 Tips for Using Normal Maps Effectively
- 3.7 Conclusion: The Power of Normal Maps in 3D Modeling
- 4 Closure
The Art of Creating Normal Maps: Enhancing Realism in 3D Modeling

Normal maps are an indispensable tool in 3D modeling, adding depth and realism to surfaces without sacrificing performance. They are essentially images that store information about the direction of surface normals, enabling software to simulate intricate details like bumps, grooves, and wrinkles. This technique allows for significant visual enhancements while keeping the underlying geometry relatively simple, leading to faster rendering times and reduced file sizes.
Understanding Normal Maps: A Visual Guide
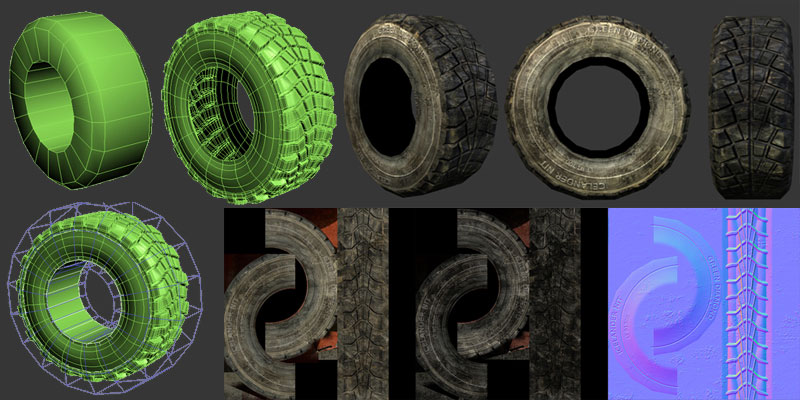
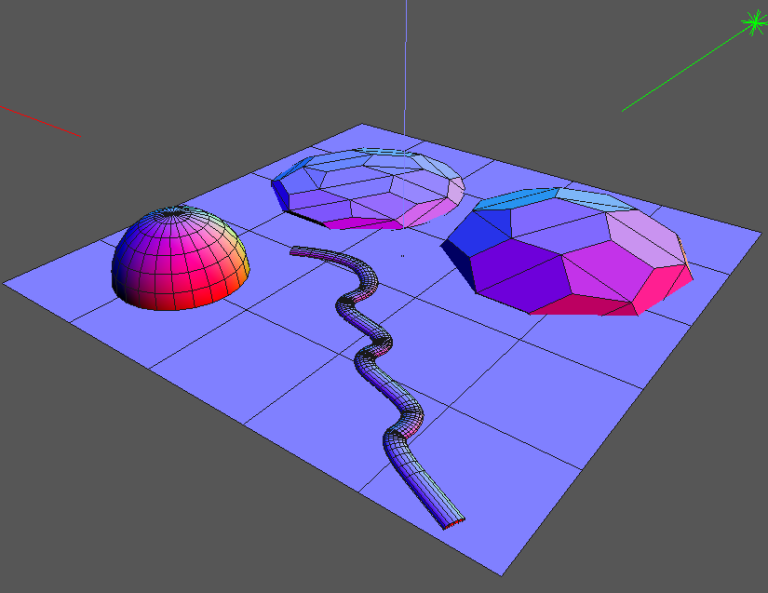
Imagine a 3D model of a rock. A basic model might consist of a simple, smooth surface. However, a real rock is far from smooth, exhibiting countless bumps, crevices, and irregularities. This is where normal maps come into play.
A normal map for the rock would be a grayscale or color image where each pixel represents the direction of a surface normal at a corresponding point on the 3D model. Brighter areas indicate surfaces facing directly towards the light source, while darker areas signify surfaces facing away. This information is then used by the rendering software to calculate how light interacts with the surface, creating the illusion of depth and detail.
Creating Normal Maps: A Step-by-Step Process
The creation of a normal map involves several steps, each contributing to the final result:
1. High-Resolution Model: The first step involves creating a high-resolution model of the object. This model will serve as the source for the normal map and should contain all the desired details, including bumps, grooves, and other surface irregularities.
2. Baking the Normal Map: The process of extracting normal map information from the high-resolution model is known as "baking." This is typically done using specialized software like 3ds Max, Maya, or Blender. The baking process involves generating a normal map image based on the surface geometry and details of the high-resolution model.
3. Normal Map Formats: Normal maps are typically stored in image formats like PNG or TGA. The image data is encoded to represent the direction of surface normals, often using a specific color scheme. For example, a blue color might indicate a surface facing directly towards the camera, while red might indicate a surface facing away.
4. Applying the Normal Map: Once the normal map is created, it can be applied to a low-resolution version of the model. This low-resolution model will be used for rendering, and the normal map will provide the necessary detail to create a visually realistic representation of the object.
5. Optimizing for Performance: Normal maps can be optimized for performance by reducing the number of pixels or using compression techniques. This can help to minimize the file size and improve rendering times.
Tools and Techniques for Normal Map Creation
A variety of tools and techniques are available for creating normal maps:
1. Software-Based Baking: 3D modeling software like 3ds Max, Maya, and Blender offer built-in baking functionality. These tools allow users to specify the source geometry, the target resolution, and other parameters for generating the normal map.
2. Third-Party Plugins: Several third-party plugins are available for popular 3D modeling software, offering advanced baking options and features. These plugins often provide more control over the baking process and can handle complex geometries and textures.
3. Procedural Generation: Normal maps can also be generated procedurally, using algorithms to create patterns and textures. This method allows for greater flexibility and control over the final result, but it requires a deeper understanding of procedural generation techniques.
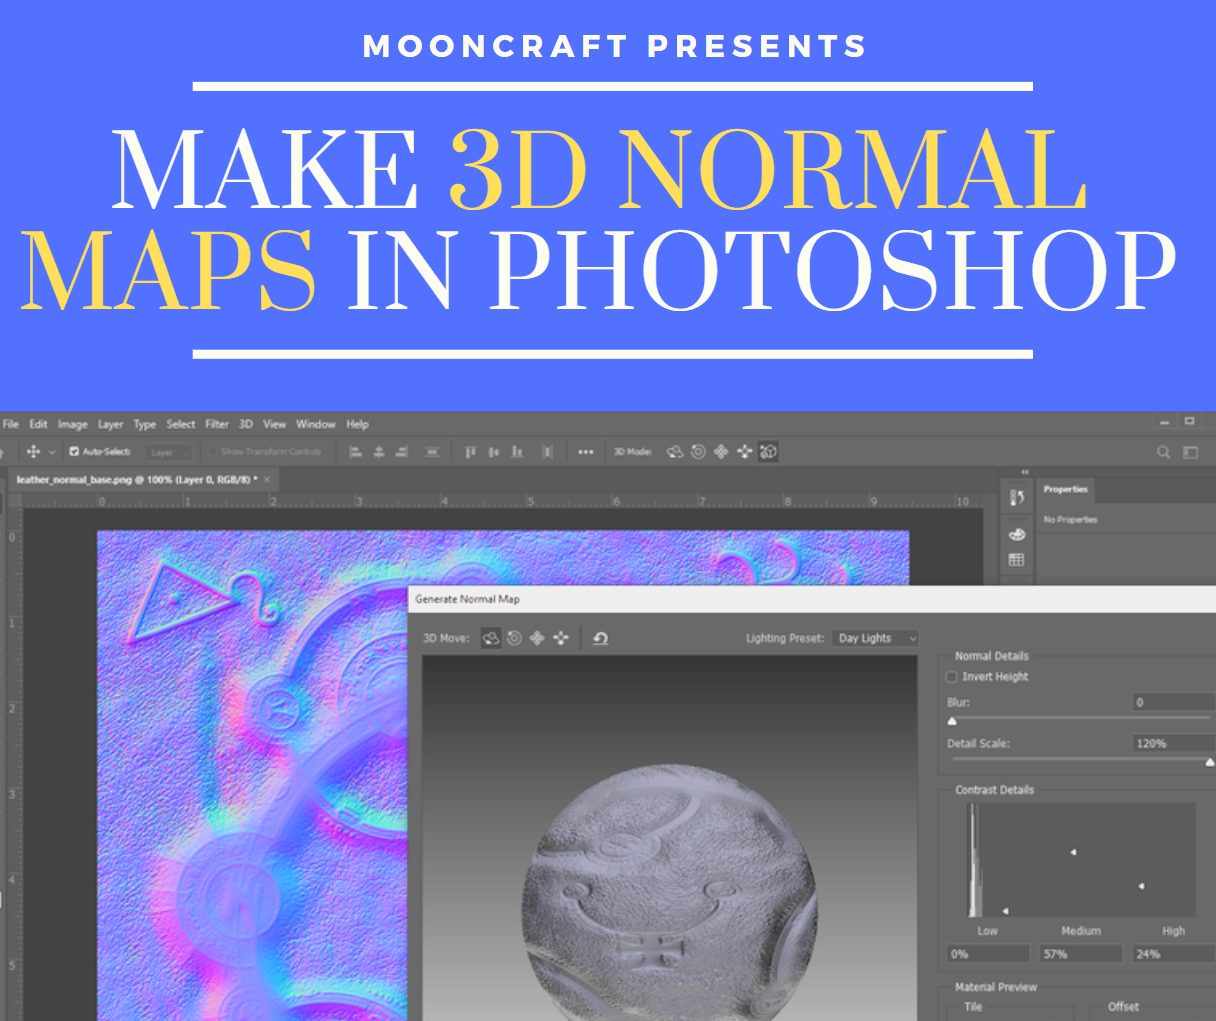
4. Photoshop Techniques: Photoshop can be used to create normal maps from existing images or to modify existing normal maps. Techniques like channel manipulation and filters can be employed to enhance the detail and realism of normal maps.
Benefits of Using Normal Maps
Normal maps offer a compelling combination of visual enhancement and performance optimization:
1. Enhanced Realism: Normal maps add depth and realism to surfaces by simulating intricate details like bumps, grooves, and wrinkles. This significantly improves the visual fidelity of 3D models without requiring complex geometry.
2. Performance Optimization: By using normal maps, 3D models can be rendered with fewer polygons, resulting in faster rendering times and reduced file sizes. This is particularly beneficial for real-time applications like games and interactive simulations.
3. Artistic Flexibility: Normal maps provide artists with greater flexibility in creating and manipulating surface details. Artists can easily adjust the intensity and scale of details, allowing for fine-tuning and experimentation.
4. Versatility: Normal maps can be used for a wide range of applications, including game development, film and animation, and architectural visualization. They are a valuable tool for any 3D artist looking to enhance the realism of their work.
FAQs about Normal Maps
1. What is the difference between a normal map and a bump map?
While both normal maps and bump maps are used to add detail to surfaces, they differ in their approach. Bump maps store information about the displacement of a surface along its normal direction, while normal maps directly store the direction of surface normals. This difference leads to distinct visual effects, with normal maps generally offering more realistic results.
2. How do I choose the appropriate resolution for my normal map?
The resolution of a normal map should be chosen based on the size and detail of the object it is applied to. A higher resolution normal map will offer greater detail but will also increase file size and potentially impact performance. A lower resolution normal map will offer less detail but may be more efficient.
3. What are the best practices for creating normal maps?
Several best practices can help ensure the creation of high-quality normal maps:
- Use a high-resolution model: The source model should be detailed enough to capture all the desired surface features.
- Optimize the baking settings: Experiment with different baking settings to find the optimal balance between detail and performance.
- Use a proper normal map format: Choose a format that supports the necessary color encoding for storing normal map data.
- Apply the normal map correctly: Ensure the normal map is properly aligned and scaled to the target model.
4. Can I use normal maps with any rendering software?
Most modern rendering software supports normal maps, including 3ds Max, Maya, Blender, and Unreal Engine. However, the specific implementation and support for different normal map formats may vary.
5. What are the limitations of normal maps?
While normal maps are a powerful tool, they do have some limitations:
- Limited displacement: Normal maps only simulate the appearance of displacement, not actual geometric changes. This means they cannot create truly self-shadowing or self-occluding details.
- Artifacting: If not created or applied correctly, normal maps can lead to artifacts such as banding, aliasing, or stretching.
- Performance impact: Although normal maps can improve performance compared to high-resolution models, they still have a performance impact, especially with high-resolution maps.
Tips for Using Normal Maps Effectively
1. Understand the workflow: Before creating normal maps, familiarize yourself with the entire workflow, including modeling, baking, and application.
2. Optimize the source model: Ensure the high-resolution model is properly optimized for baking, with clean geometry and appropriate detail levels.
3. Experiment with baking settings: Different baking settings can significantly impact the quality and performance of the normal map. Experiment with various options to find the best balance.
4. Use a proper normal map format: Choose a format that supports the necessary color encoding and compression for efficient storage and rendering.
5. Apply the normal map correctly: Ensure the normal map is properly aligned, scaled, and applied to the target model.
6. Avoid excessive detail: While normal maps can add detail, avoid using them to create overly intricate or unrealistic surfaces.
7. Optimize for performance: Consider using techniques like compression or reducing resolution to minimize file size and improve performance.
8. Use normal maps in conjunction with other techniques: Combine normal maps with other techniques like displacement maps, bump maps, or ambient occlusion maps for enhanced realism.
Conclusion: The Power of Normal Maps in 3D Modeling
Normal maps are an invaluable tool for 3D artists, offering a powerful way to enhance the realism of models without sacrificing performance. By understanding the process of creating and applying normal maps, artists can leverage this technique to create visually stunning and detailed 3D worlds. Whether used in games, animation, or visualization, normal maps remain an essential part of the modern 3D artist’s toolkit.


Closure
Thus, we hope this article has provided valuable insights into The Art of Creating Normal Maps: Enhancing Realism in 3D Modeling. We appreciate your attention to our article. See you in our next article!